BotOp (Robot Operation) interface
BotOp (=robot operation) defines a very narrow interface to control a real or simulated robot. While in initial years we tried all kinds of other interfaces (ROS-given, operational space control interfaces, controller state machines, etc), this one seems most pragmatic, simple, transparent, and compatible to our research work at the LIS research team. There is no ROS or complex IPC involved, just a few threads (communicating with hardwares) interfaced via BotOp.
The interface essentially provides move methods to set/overwrite a spline reference for the robot. (Also compliance around the reference can be set.) Gripper methods to operate grippers. And getImage.. methods grab images or point clouds from the camera.
This interface quite different to a more generic physical simulation interface. If you’re interested in the latter (e.g. to implement a gym environment) look at the Simulation tutorial. BotOp uses a Simulation (optionally) as an underlying engine, but is quite different in that it is wrapped as a real-time threaded process that emulates the specific BotOp interface to a real robot – to make it swappable with a real robot. If BotOp it run in simulation mode, the simulation can be run
in many different modes: pure kinematic (no physics for objects), a physics simulator with physics for objects but still kinematic robot, a physic simulator with PD motors for the robot.
Sending motion based on IK
We’ll show how to make the robot move to pre-computed joint space poses, e.g. computed via IK. Later we modify this to overwriting the motion reference with high frequency, which essentially realizes MPC-style control.
The first step (also for operating the real robot) is always to load a configuration:
[1]:
from robotic import ry
import numpy as np
import time
[2]:
C = ry.Config()
C.addFile(ry.raiPath('../rai-robotModels/scenarios/pandaSingle.g'))
C.view(False, 'this is your workspace data structure C -- NOT THE SIMULTATION')
[2]:
0
Let’s open a BotOp interface in simulation (False). True would directly open communication to one or two pandas (depending no how many are defined in C).
[3]:
bot = ry.BotOp(C, useRealRobot=False)
#note that in sim, when physx multibody is activated, arms are going down! free floating...
Note the simulation window, showing that the simulation is running in a thread and the given control reference time.
Let’s define 2 trivial reference poses, q0=home and q1=(2nd joint bend), so that we can move back and forth between them:
[4]:
qHome = bot.get_qHome()
q0 = qHome.copy()
q1 = q0.copy()
q1[1] = q1[1] + .2
print(q0, q1)
[ 0. -0.5 0. -2. 0. 2. -0.5] [ 0. -0.3 0. -2. 0. 2. -0.5]
The moveTo is the simplest way to move the robot from current to target. It internally creates a cubic B-spline to the target with optimal timing and follows it. The call is non-blocking. Also, your workspace config C is not kept in sync with the real/sim. If you want to wait till the motion is finished, you need to do manually checking the getTimeToEnd (=time til the end of the given spline reference), and meanwhile staying sync’ed.
[5]:
bot.moveTo(q1)

while bot.getTimeToEnd()>0:
    bot.sync(C, .1)
We can append to the internal spline reference at any time: As moveTo is non-blocking, you can append several moves like this:
[6]:
print('timeToEnd:', bot.getTimeToEnd())
bot.moveTo(q0)
print('timeToEnd:', bot.getTimeToEnd())
bot.moveTo(q1)
print('timeToEnd:', bot.getTimeToEnd())
bot.moveTo(q0)

while bot.getTimeToEnd()>0:
    bot.sync(C, .1)
timeToEnd: -0.09828105793499753
timeToEnd: 1.0957189420649807
timeToEnd: 2.191437884129961
Reactive control: Overwriting the reference
Setting splines becomes reactive, when we can smoothly overwrite the spline reference with high frequency. Technically (internally), smoothly overwriting means to take the current dynamic state (pose, velocity) and create a new cubic B-spline with current state as start and given target as end, with optimal timing.
To demonstrate this let’s consider a more involved scenario, where the target is a frame that is randomly moving, and we use repeated IK in each cycle to track it.
[7]:
#this reference frame only appears in your workspace C - not the simulation!
target = C.addFrame('target', 'table')
target.setShape(ry.ST.marker, [.1])
target.setRelativePosition([0., .3, .3])
pos = target.getPosition()
cen = pos.copy()
C.view()
[7]:
0
The following defines a very basic Inverse Kinematics method – you’ll learn more about this in the next tutorial.
[8]:
def IK(C, pos):
    q0 = C.getJointState()
    komo = ry.KOMO(C, 1, 1, 0, False) #one phase one time slice problem, with 'delta_t=1', order=0
    komo.addObjective([], ry.FS.jointState, [], ry.OT.sos, [1e-1], q0) #cost: close to 'current state'
    komo.addObjective([], ry.FS.jointState, [], ry.OT.sos, [1e-1], qHome) #cost: close to qHome
    komo.addObjective([], ry.FS.positionDiff, ['l_gripper', 'target'], ry.OT.eq, [1e1]) #constraint: gripper position

    ret = ry.NLP_Solver(komo.nlp(), verbose=0) .solve()

    return [komo.getPath()[0], ret]
The following does not really move the robot: it is just ‘setting’ the workspace C to the IK solution. No motion is send to the real/robot:
[9]:
for t in range(20):
    time.sleep(.1)
    pos = cen + .98 * (pos-cen) + 0.02 * np.random.randn(3)
    target.setPosition(pos)

    q_target, ret = IK(C, pos)
    print(ret)
    C.setJointState(q_target)
    C.view()
{ time: 0.002842, evals: 6, done: 1, feasible: 1, sos: 0.0067775, f: 0, ineq: 0, eq: 0.0005408 }
{ time: 0.002032, evals: 3, done: 1, feasible: 1, sos: 0.00321675, f: 0, ineq: 0, eq: 0.000900211 }
{ time: 0.001523, evals: 2, done: 1, feasible: 1, sos: 0.0031297, f: 0, ineq: 0, eq: 0.00110733 }
{ time: 0.000393, evals: 3, done: 1, feasible: 1, sos: 0.0037666, f: 0, ineq: 0, eq: 0.00255867 }
{ time: 0.003193, evals: 4, done: 1, feasible: 1, sos: 0.00455003, f: 0, ineq: 0, eq: 0.000192847 }
{ time: 0.001693, evals: 4, done: 1, feasible: 1, sos: 0.00367259, f: 0, ineq: 0, eq: 0.00026511 }
{ time: 0.000392, evals: 4, done: 1, feasible: 1, sos: 0.00428734, f: 0, ineq: 0, eq: 0.000144815 }
{ time: 0.000217, evals: 4, done: 1, feasible: 1, sos: 0.00316682, f: 0, ineq: 0, eq: 0.000338487 }
{ time: 0.002715, evals: 4, done: 1, feasible: 1, sos: 0.00339213, f: 0, ineq: 0, eq: 0.000222226 }
{ time: 0.000955, evals: 3, done: 1, feasible: 1, sos: 0.00354052, f: 0, ineq: 0, eq: 0.00201801 }
{ time: 0.000375, evals: 4, done: 1, feasible: 1, sos: 0.00412341, f: 0, ineq: 0, eq: 0.000264779 }
{ time: 0.001238, evals: 3, done: 1, feasible: 1, sos: 0.00379458, f: 0, ineq: 0, eq: 0.00320893 }
{ time: 0.003819, evals: 4, done: 1, feasible: 1, sos: 0.00381466, f: 0, ineq: 0, eq: 0.00063563 }
{ time: 0.001351, evals: 3, done: 1, feasible: 1, sos: 0.00433728, f: 0, ineq: 0, eq: 0.00278551 }
{ time: 0.001375, evals: 3, done: 1, feasible: 1, sos: 0.00378, f: 0, ineq: 0, eq: 0.00317554 }
{ time: 0.001355, evals: 3, done: 1, feasible: 1, sos: 0.00385413, f: 0, ineq: 0, eq: 0.0032276 }
{ time: 0.00047, evals: 3, done: 1, feasible: 1, sos: 0.00407101, f: 0, ineq: 0, eq: 0.00110385 }
{ time: 0.002052, evals: 4, done: 1, feasible: 1, sos: 0.00452004, f: 0, ineq: 0, eq: 0.000197274 }
{ time: 0.001125, evals: 3, done: 1, feasible: 1, sos: 0.0038175, f: 0, ineq: 0, eq: 0.00375235 }
{ time: 0.000473, evals: 4, done: 1, feasible: 1, sos: 0.00390226, f: 0, ineq: 0, eq: 0.000188478 }
We now generate reative motion by smoothly overwriting the spline reference. Increasing time cost makes it more agressive (penalized total duration of estimated cubic spline).
[10]:
for t in range(100):
    bot.sync(C, .1) #keep the workspace C sync'ed to real/sim, and idle .1 sec
    pos = cen + .98 * (pos-cen) + 0.02 * np.random.randn(3)
    target.setPosition(pos)

    q_target, ret = IK(C, pos)
    bot.moveTo(q_target, timeCost=5., overwrite=True)
Aborting motion
Good practise is to always allow a user aborting motion execution. In this example, key ‘q’ will break the loop and call a home() (which is the same as moveTo(qHome, 1., True)
[11]:
for t in range(5):
    print(t)
    bot.moveTo(q1)
    bot.wait(C) #same as 'loop sync til keypressed or endOfTime', but also raises user window
    if bot.getKeyPressed()==ord('q'):
        print("cancelled")
        break;

    bot.moveTo(q0)
    bot.wait(C)
    if bot.getKeyPressed()==ord('q'):
        print("cancelled")
        break;

bot.home(C)
0
cancelled
Gripper operation
Gripper movements also do not block:
[12]:
bot.gripperMove(ry._left, width=.01, speed=.2)

while not bot.gripperDone(ry._left):
    bot.sync(C, .1)

bot.gripperMove(ry._left, width=.075, speed=1)

while not bot.gripperDone(ry._left):
    bot.sync(C, .1)
Camera & Point Could
BotOp also interfaces basic grabbing of image and depth. In simulation model, the sensor name needs to be a frame name that has camera attributed defined. On the real robot, a realsense camera is directly grabbed.
[13]:
rgb, depth, points = bot.getImageDepthPcl('cameraWrist')
[14]:
import matplotlib.pyplot as plt

fig = plt.figure(figsize=(10,5))
axs = fig.subplots(1, 2)
axs[0].imshow(rgb)
axs[1].matshow(depth)
plt.show()
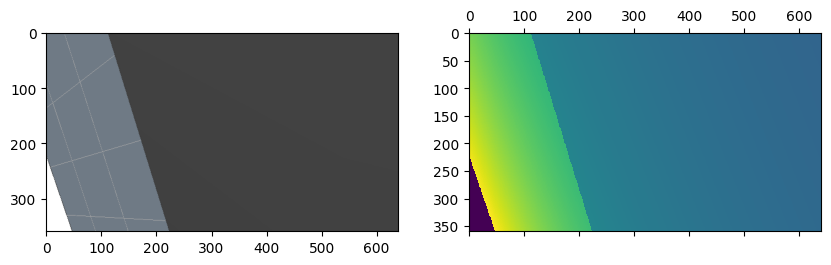
The returned points are a point could, that was directly computed from the depth image and the camera intrinsics. The intrinsics are given by the focal lengths (f_x, f_y) and image center (c_x, c_y). We can also manually compute the point cloud as follows:
[16]:
fxycxy = bot.getCameraFxycxy("cameraWrist")
points2 = ry.depthImage2PointCloud(depth, fxycxy)
np.linalg.norm(points - points2)
[16]:
0.0
The point cloud is given relative to the camera frame. We can display it by creating a dedicates frame, attached to the camera frame, and setting its (purely visual) shape to be the point cloud:
[17]:
pclFrame = C.addFrame('pcl', 'cameraWrist')
pclFrame.setPointCloud(points, rgb)
pclFrame.setColor([1.,0.,0.]) #only to see it when overlaying with truth
C.view()
[17]:
0
Shutdown
You always need to shut down processes (e.g. communication with the real robot) properly. That’s done here by explicitly destroying the objects:
[18]:
del bot
del C
-- bot.cpp:~BotOp:112(0) shutting down BotOp...
-- simulation.cpp:~BotThreadedSim:56(0) shutting down SimThread
-- simulation.cpp:~Simulation:148(0) shutting down Simulation
Parameters
BotOp (and other parts of the rai code) use all kinds of internal parameters that can be configured. The best way to look which parameters actually are used/relevant is to retrospect print the list of parameters have been queried by the code so far. That gives an idea of which global parameters exist:
[19]:
ry.params_print()
-- ry.cpp:operator():86(0) python,
message: "this parameter was loaded from 'rai.cfg'",
bot/useGripper,
bot/useRobotiq!,
bot/useArm: left,
botsim/hyperSpeed: 1,
botsim/verbose: 1,
botsim/engine: physx,
physx/verbose: 1,
physx/yGravity!,
physx/softBody!,
physx/multiBody,
physx/multiBodyDisableGravity,
physx/jointedBodies!,
physx/angularDamping: 0.1,
physx/defaultFriction: 1,
physx/defaultRestitution: 0.1,
physx/motorKp: 1000,
physx/motorKd: 100,
bot/useOptitrack!,
bot/useAudio!,
bot/raiseWindow!,
KOMO/verbose: 1,
KOMO/animateOptimization: 0,
KOMO/mimicStable,
KOMO/useFCL,
KOMO/unscaleEqIneqReport!,
KOMO/sampleRate_stable: 0,
opt/verbose: 1,
opt/stopTolerance: 0.01,
opt/stopFTolerance: -1,
opt/stopGTolerance: -1,
opt/stopEvals: 1000,
opt/stopIters: 1000,
opt/stopOuters: 1000,
opt/stopLineSteps: 10,
opt/stopTinySteps: 10,
opt/initStep: 1,
opt/minStep: -1,
opt/maxStep: 0.2,
opt/damping: 1,
opt/stepInc: 1.5,
opt/stepDec: 0.5,
opt/wolfe: 0.01,
opt/boundedNewton,
opt/muInit: 1,
opt/muInc: 5,
opt/muMax: 10000,
opt/muLBInit: 0.1,
opt/muLBDec: 0.2,
opt/maxLambda: -1,
opt/constrainedMethod: ,
seed: 0
That might tell you a lot about what happend internally.
In the context of BotOp, the parameter botsim/engine can also be set to kin, which would create a simulation without physics where merely the robot moves (and grasped object can be attached/detached). The botsim/verbose above leads to the explicit verbosity when creating the simulator interface.
Parameters can be set in a local file rai.cfg, or manually in python with the following calls – but that need’s to be done BEFORE BotOp is created.
[20]:
ry.params_add({'botsim/verbose': 2., 'physx/motorKp': 10000., 'physx/motorKd': 1000.})
ry.params_add({'botsim/engine': 'physx'}) #makes a big difference!
ry.params_add({'physx/multibody': True}) #makes a big difference!
[ ]: